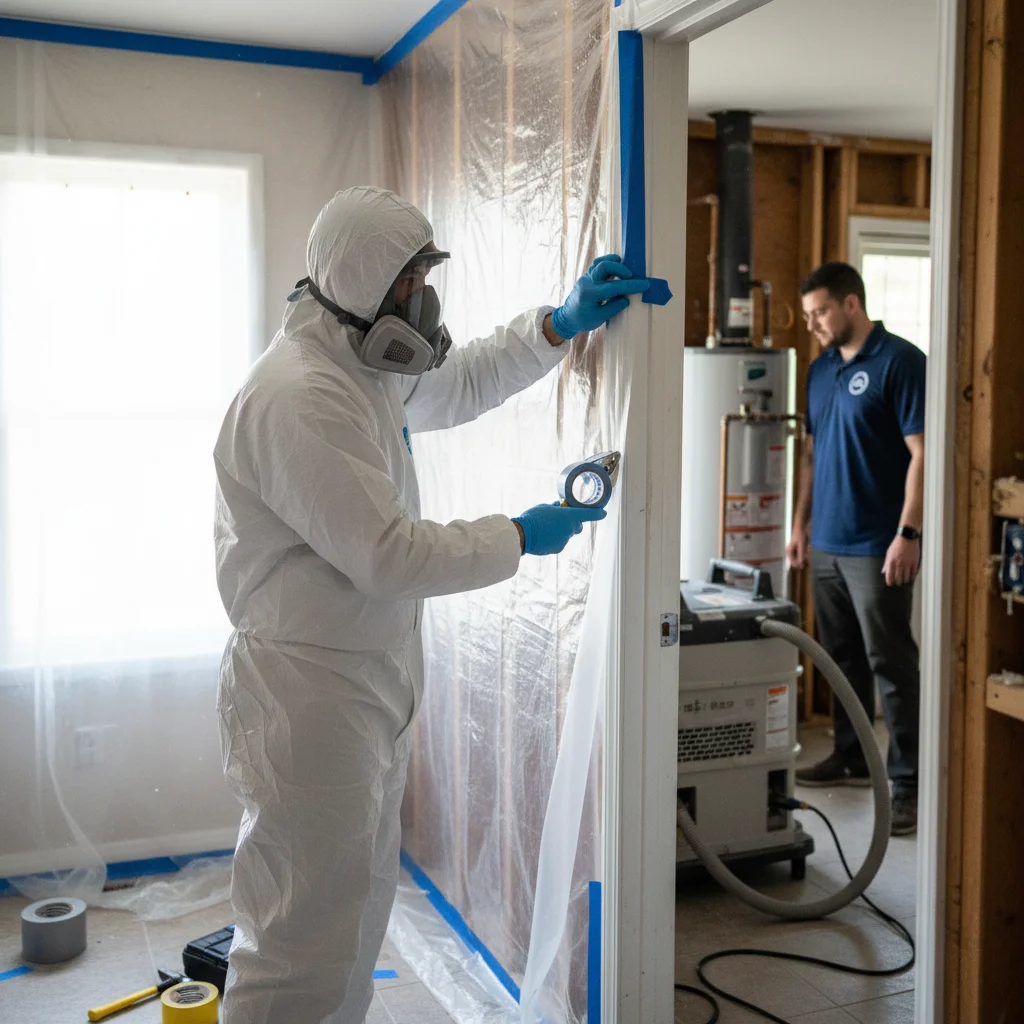
Finding mold in your San Diego home feels overwhelming. Whether it’s a musty smell from a slow leak or visible spots after a pipe burst, the first instinct is often to scrub it away. But a professional mold remediation process isn’t just about cleaning; it’s a systematic, science-based approach designed to protect your property and, more importantly, your family’s health.

A certified mold remediation technician in full PPE (respirator, white suit) carefully setting up a plastic containment barrier in a home.

Understanding what mold remediation companies do reveals why a DIY approach with a bottle of bleach is often ineffective and can even make the problem worse. The IICRC S520 (Institute of Inspection, Cleaning and Restoration Certification) sets the industry standard for the process: containment, controlled removal, and prevention. Let’s walk through exactly how professional mold remediation works.

Step 1: The initial inspection and mold damage assessment

The first step in any professional mold remediation process is a thorough assessment. This goes far beyond just looking at the visible growth. The technicians on the job act like detectives to uncover the full scope of the problem and, crucially, to identify the source of the moisture that’s feeding the mold. Mold is a symptom; water is the disease.

Technicians use specialized equipment like moisture meters and thermal imaging cameras to find hidden water in walls, under floors, and in ceilings. This helps map out the extent of the damage, which is often much larger than what you can see. The goal is to understand how far the water and mold have spread.

During this phase, the crew develops a detailed remediation plan tailored to your specific situation. This plan outlines the containment strategy, the scope of material removal required, and the cleaning protocols that will be used. This assessment is the blueprint for a successful project. Without it, you’re just guessing, and that can lead to missed contamination and a quick return of the mold. It answers the fundamental question many homeowners have after a leak: will water damage grow mold? Understanding the conditions is how a crew builds a plan to stop it for good.

Step 2: Containment to prevent cross-contamination

This is one of the most critical mold removal steps and a major reason why DIY mold removal is so risky. When you disturb mold colonies by trying to scrub or remove them, you release millions of microscopic spores into the air. Without proper containment, these spores can easily travel through your HVAC system and spread to unaffected areas of your home, turning a small, localized problem into a whole-house issue.

To prevent this, crews establish a secure containment zone. This involves several key actions:

  • Physical Barriers: Heavy-duty plastic sheeting seals off the affected area from the rest of the house. This includes covering doorways, vents, and any other openings.
  • Negative Air Pressure: Crews set up a “negative air machine” that pulls air from the contaminated zone and filters it before exhausting it outside. This creates a vacuum effect, ensuring that any airborne spores or dust are contained within the work area and can’t escape into clean parts of your home.

This step is non-negotiable for any legitimate mold remediation project. It’s a fundamental safety protocol outlined in the IICRC S520 Standard for Professional Mold Remediation. Containment protects the health of your family and the crew on site, and it prevents a small problem from becoming a much larger, more expensive one.

Step 3: Air filtration with HEPA filters

Working hand-in-hand with containment is air filtration. Even with the best containment, the process of removing mold-infested materials will stir up spores within the work area. To manage this, crews deploy high-powered air scrubbers fitted with HEPA filters.

A close-up of a HEPA air scrubber running in a room during a mold remediation job.

HEPA stands for High-Efficiency Particulate Air. These are not your average air filters. A true HEPA filter is certified to capture 99.97% of airborne particles as small as 0.3 microns. To put that in perspective, a typical mold spore is between 3 and 40 microns. These machines are incredibly effective at pulling spores, dust, and other contaminants out of the air.

The air scrubbers run continuously throughout the entire remediation project. This constant filtration cleans the air inside the containment zone, drastically reducing the number of airborne spores. This makes the work area safer for the crew and ensures that when the containment is finally taken down, the air in the room is clean. Skipping this step would be like trying to clean up dust in the middle of a dust storm. It’s an essential part of a professional mold remediation process that ensures once the mold is gone, it’s truly gone.

Step 4: Removing mold-infested materials

Once containment and air filtration are in place, the physical removal of the mold can begin. Unfortunately, certain materials simply cannot be saved once mold has taken root. Porous materials act like a sponge, allowing mold’s root-like structures (called hyphae) to grow deep inside, making complete removal impossible.

Materials that typically require removal include:

  • Drywall and plaster
  • Insulation
  • Carpet and carpet padding
  • Ceiling tiles
  • Wallpaper

Technicians carefully cut away and remove these materials, extending beyond the visible signs of mold to ensure all of it is gone. All contaminated debris is double-bagged in thick, sealed plastic bags before being removed from the containment area to prevent any cross-contamination.

For semi-porous materials like wood studs, crews may be able to save them. This often involves intensive cleaning techniques like wire brushing, sanding, or media blasting (using dry ice or soda) to physically remove the surface growth. Non-porous materials like metal, glass, and hard plastics can almost always be cleaned and sanitized. The decision to remove or restore is based on IICRC standards and a professional assessment of the damage. This careful, methodical removal is a core part of what a professional mold remediation crew provides.

Step 5: Cleaning and sanitizing affected areas

After all contaminated materials have been removed, the next step is to clean everything that remains. This isn’t a simple wipe-down. This phase is designed to remove any lingering mold spores and dust from the surfaces within the containment zone.

The process starts with a thorough HEPA vacuuming of all surfaces, including wood framing, concrete subfloors, and any remaining fixtures. This captures any settled dust and spores that were knocked loose during demolition.

Next, crews clean the surfaces with specialized cleaning agents. It’s a common misconception that bleach is the best way to kill mold. According to the US Environmental Protection Agency (EPA), bleach is not recommended for cleaning mold on porous surfaces like wood because its main component, chlorine, cannot penetrate the surface. The water in the bleach, however, can soak in and actually feed any remaining mold roots. Instead, professional-grade, EPA-registered antimicrobial and antifungal treatments are used. These products are specifically designed to kill mold and prevent its return without causing the collateral damage that bleach can. Every remaining surface in the containment area is meticulously cleaned to ensure the area is truly free of contamination.

Step 6: The final restoration phase

With the mold gone and the area thoroughly cleaned and dried, the final phase of the mold remediation process begins: restoration. This is where the crew rebuilds and repairs the affected area to return it to its original condition, or even better. The goal is to make it look like the damage never happened.

Before any rebuilding starts, the crew verifies that the area is completely dry, using moisture meters to confirm that wood framing and other materials are at an acceptable moisture level. Rebuilding over damp materials is a recipe for a recurring mold problem. In some cases, especially for larger projects or when a property’s occupant has a health concern, a third-party Indoor Environmental Professional may be brought in to conduct post-remediation verification, or “clearance testing,” to certify the area is clean.

Once there’s confirmation that the area is safe and dry, skilled technicians can begin the repairs. This can include:

  • Installing new insulation
  • Hanging and finishing new drywall
  • Priming and painting
  • Installing new flooring
  • Replacing baseboards and trim
  • Re-installing cabinetry

The crew you’re matched with manages the entire process, so you don’t have to coordinate with multiple contractors. From the initial inspection to the final coat of paint, they provide a complete solution to your mold problem.

When to call us

If you discover a mold problem that’s larger than about 10 square feet, caused by a sewage backup, or if you suspect it’s hiding in your walls, it’s time to call a professional. A certified and licensed restoration company has the training, equipment, and experience to handle the job safely and effectively.

Call us at (858) 400-4586 and we’ll connect you with a local pro.